A Cylindrical Superelement for Thermo-Mechanical Analysis of Thin Composite Vessels
A. Jafarzadeh, A. Taghvaeipour* and M. R. Eslami
Department of Mechanical Engineering, Amirkabir University of Technology (Tehran Polytechnic), Hafez Ave., Tehran, Iran
E-mail: afshin.taghvaeipour@gmail.com
*Corresponding Author
Received 31 July 2020; Accepted 02 November 2020; Publication 04 January 2021
Abstract
In this study, a new cylindrical shell superelement with trigonometric shape functions is developed. This element is formulated based on the classical theory of shells, and it is especially designed for coupled-field analysis of thin cylindrical vessels or tubes made of composite materials. As a case study, a thermo-mechanical analysis of a thin composite cylinder is conducted. By invoking to the uniform and non-uniform meshing, the deformation and the stress results are calculated and compared with the analytical solutions. At the end, the efficiency and accuracy of the proposed superelement is also depicted via comparison of the corresponding results with the ones which are calculated by means of shell elements and via a commercial software package.
Keywords: Classical theory of shell, cylindrical vessels, trigonometric shape functions, shell superelement, composite cylinders.
1 Introduction
During the last decades, many researchers have studied mechanical and thermal behavior of the composite cylinders, which may be used in pressure vessels and tubes. In this regard, Xia et al. [1] used the three-dimensional anisotropic elasticity theory to investigate the influence of stacking sequence on the mechanical properties of a multi-layered filament-wound composite pipe with three different angle-ply and in the presence of an internal pressure. The authors also investigated the shear twisting coupling characteristic. The same authors used the classical laminated-plate theory and calculated the stress and deformation of laminated sandwich pipes with different winding angles and under combined internal pressure and temperature differences [2]. By resorting to the three-dimensional anisotropic elasticity theory, Bakayan et al. [3] conducted the thermal analysis of a composite pipe under the combined internal pressure and temperature gradient loadings. Xu et al. [4] predicted the failure strength of composite pipes by incorporating different failure criteria such as the maximum stress, Tsai-Hill, and etc. In fact, they used a three dimensional parametric FE model of the cylindrical part to explore the non-linear stress–strain relationship, and accordingly, the final failure pressure. Pagans et al. [5] used the classical lamination theory and generalized plane strain model to design and predict the behavior of fiber reinforced composite pressure vessels. The authors applied mechanical, thermal, and moisture loadings on the body, and finally, they obtained the optimum values for the winding angle, burst pressure, maximum axial force, and the maximum angular speed of the pressure vessel. Numerical and experimental studies on the filament wound composite tubes subjected to an internal pressure was also conducted by Martins et al. [6]. The numerical and experimental results were properly compatible for all fiber directions. While most of the reported researches were focused on the stress analysis of thick hollow cylinders, Sayman [7] developed a general stress analysis of thick and thin multi-layered composite cylinders under hygrothermal loadings. The solution was obtained for composite cylinders with symmetrical and antisymmetrical layers and for open and closed end conditions. The thermo-mechanical behavior of structures by analytical methods is, in general, complicated. However, with some simplifications and for a number of classical problems, the analytical solutions are available [8, 9]. Some researchers also developed analytical methods to cope with the thermo-mechanical analysis of cylindrical vessels made of functionally graded materials (FGM) [10, 11]. However, these works are mostly developed for thick vessels or tubes which are made of orthotropic materials.
The finite element method is proved to be a reliable and strong numerical approach in modeling and analysis of complex structures. In this method, a structure is discredited into many elements with simple geometries. Due to recent developments of the computational geometry, fairly advanced discretization methods have been proposed, and hence, with some effort, any complex geometry can be meshed. However, this usually leads to a bulk of nodes with many degrees-of-freedom (dof) which can be problematic in large systems. This can be even more severe when a nonlinear time-dependent analysis should be conducted. Accordingly, the accuracy of the method is mostly relied on the discritization quality. In the recent years, new type of large elements with trigonometric shape functions are introduced which are called superelements. These elements are especially designed for time-consuming iterative analyses of which less number of dof is demanded. These types of elements were first introduced by Koko et al., and called superelements [12]. Koko and Olson first used the super plate and beam finite elements to calculate the natural frequency and mode shapes of stiffened rectangular plates [13]. They validated their results with other numerical and experimental works. Jiang and Olson [14, 15] introduced three shell, curved beam, and straight beam superelements for the free vibration analysis of stiffened cylindrical shells. Moreover, the superelements were also incorporated in the static and dynamic analysis of orthogonally stiffened cylindrical shells. In this work, the stiffeners were assumed to be in form of curved and straight beams. In addition, the results including natural frequency and mode shapes were compared with the ones which were obtained by the conventional finite elements and experimental tests. As a result, high rate of convergence and accuracy were reported. In [16, 17] Ahmadian et al. employed a plate superelement to analyze the forced and free vibrations of an orthotropic rectangular plate with different boundary conditions. They considered bending and in-plane effects and assumed continuity for in-plane and continuity for out-of plane displacements. In one of the recent works, Ju and choo used a superelement to conduct static analysis of a cable passing through multiple pulleys [18]. In this paper deformations and stresses were calculated by superelements and compared with experimental tests; the results showed a good agreement. Ahmadian et al. [19] introduced a solid cylindrical superelement for the static and modal analyses of laminated hollow cylinders. Accordingly, in [20], Taghvaeipour et al. incorporated the foregoing element for the modal analysis of a thick hollow cylinder made of FGM. The reported results show a good accuracy with those reported in literature. Using the same concept, Ahmadian et al. [21, 22, 23] have defined the spherical and tapered super elements. With these new elements, they conducted structural analysis of spherical components such as biologic cells, nano bearings, pressure vessels, and fullerene. Recently, Pourhamid et al. [24] employed the cylindrical superelement to conduct the stress analysis on a cylinder-piston of a combustion engine which is made of FGM.
In this study, based on the classical theory of shell, a cylindrical superelement for thin cylinders, made of composite materials, is introduced. Comparing with other superelements in the literature, the introduced element is designed for shell structures in which one level of nodes exists through the thickness. Moreover, the radial deformation slope is considered as a continuous degree of freedom. In other words, this superelement is continuous in which the slop continuity condition results in a more accurate strain and stress calculation. The superelements introduced in the literature are often resorted on Continuous shape functions in which only the displacements are continuous, and thus, they demand higher number of elements for better accuracy in the calculation of strains and stresses. As a case study, the defined element is incorporated on a thin composite cylinder which is under thermo-mechanical loadings. The obtained results are first compared with the analytical solutions which were reported in the literature, and next with the ones obtained by shell elements in a commercial software package.
2 Element Definition
2.1 Geometry and Coordinate System of Element
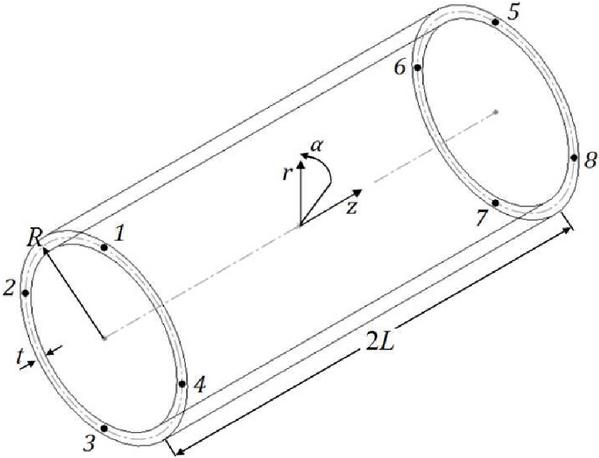
In general, shell structures are divided into two types: thin- and thick-walled. Here, we consider the superelement for a thin shell with a cylindrical geometry. The element has a mid-surface radius of , thickness of , and the length of . The word ”thin-walled” means, that the ratio is larger than 1/1000 and less than 1/20 [25]. The thickness is considered constant all over the element. To derive the corresponding equations, the cylindrical coordinate system is used which is located at the center of the element. The nodes are distributed uniformly along two edges of the element and at the mid-surface. Geometrical properties, coordinates, and nodes are shown in Figure 1. The cylindrical global coordinate system is selected with , , and components, namely [12],
| (1) |
where
| (2) |
Figure 1 Cylindrical Shell Superelement.
2.2 Element Degrees of Freedom and Shape Functions
As it was mentioned, the element is defined based on the classical shell theory in which the radial displacement component is independent of the radial coordinate [25, 26]. In this regard, the displacements in an arbitrary point of the shell are defined as [27],
| (3) | ||
where , , and are the tangential, axial, and radial displacements, respectively, and , , and are the corresponding displacements at the mid-surface of the shell. Also, and are rotations in the tangential and axial directions, respectively. Equation 3 shows that and depend on the radial coordinate , where is independent of it. The rotations are also defined as [27]:
| (4) |
Since the rotations depend on the first derivative of , it should be approximated by -continuous shape functions. However, other displacements need -continuous shape functions [28, 29]. Therefore, the displacement vector at a point at the mid-surface is defined as
| (5) |
where the first four degrees of freedom need to be approximated by -continuous shape functions. Hence, the corresponding shape function will have constants (four times the number of nodes). Therefore, the radial displacement is approximated as [28, 29]:
| (6) | |||
where , , , and are -continuous shape functions. Accordingly, the approximation function is assumed as a combination of trigonometry and polynomial functions, namely,
| (7) | ||
By invoking the necessary conditions on the approximation function, the constants are calculated. For the sake of brevity, the shape functions are presented in the appendix A. Moreover, the tangential and axial displacements at the mid surface can be approximated with -continuous identical functions, namely,
| (8) |
Likewise, the eight constants can be calculated by applying the necessary conditions on the approximation function. As a result, the displacement function can be written in terms of nodal displacements and shape functions as
| (9) | ||
in which and are tangential and axial nodal displacements, respectively. The shape functions are given in the appendix A. In total, this element has shape functions. By resorting to the FEM notations, the vector , which is the vector of displacement components (Equation 5), can be obtained as follows
| (10) |
where is the nodal displacement vector in which
| (11) |
Also, is the matrix of shape functions which is defined as
| (12) |
where is a zero matrix and
| (13) |
3 The FEM Formulations
3.1 Kinematic Relations
In the classical shell theory, the shear strains and and the radial strain are neglected. The remained strains are functions of strains at the mid-surface and the curvatures, namely [27]:
| (14) | ||
where , , and are strains at the mid-surface which are functions of displacements [27]:
| (15) |
in which , , and are components of the shell curvatures that are defined below [27]:
| (16) | ||
Finally, the strains and shell curvatures can be presented in terms of nodal displacements, namely,
| (17) |
in which is an operator matrix which is defined as
| (18) |
3.2 Stress-strain relations
The stress-strain relation for the layer of a composite cylindrical shell with the thermo-mechanical effects is defined in [30] as:
| (19) |
where are the normal stresses, are the shear stresses, are the heat expansion coefficients, is the temperature gradient, and and are the hygroscopic expansion and the moisture concentration coefficients, respectively. The mechanical properties matrix is also expressed as [30]:
| (20) |
The components of matrix for each layer and with the specific angle ply are given in [30].
3.3 Stiffness matrix and force vectors
Finally, a system of linear equations is obtained as follows
| (21) |
where yield from the membrane strain energy of shell and can be obtained from the relation:
| (22) |
in which is the nodal strain matrix-displacement matrix which is equal to:
| (23) |
The operator matrix was defined in Equation 18. Also, is the mechanical properties matrix [30], namely,:
| (24) |
where
| (25) | ||
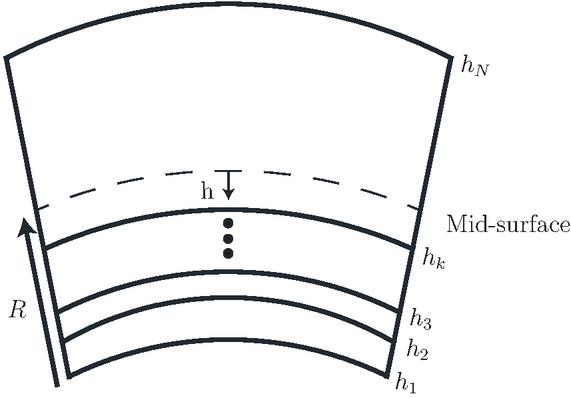
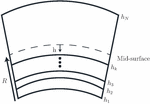
In Eqs. (18), (19), and (20), is the layer thickness, which is depicted in Figure 2. The force vectors, including the thermal and moisture effects, yield as [30]:
| (26) | ||
in which
| (27) | ||
Figure 2 Layers in the laminate.
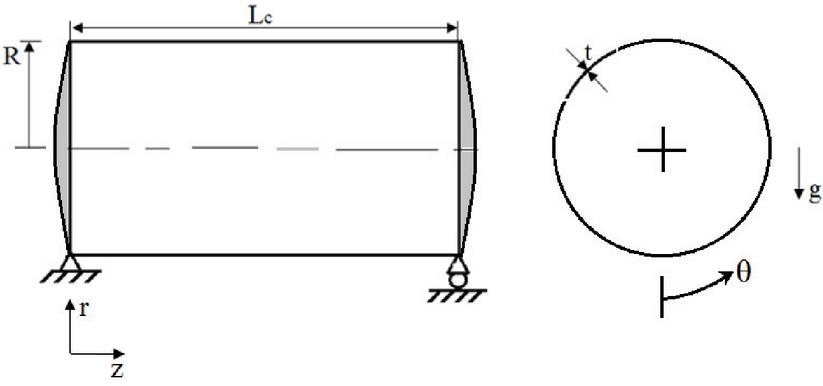
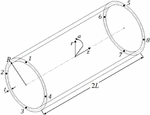
Figure 3 Schematic of the cylindrical composite shell.
4 A Case Study
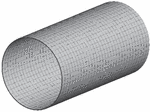
In this case study, a thin cylindrical vessel made of a laminated composite material with a lay-up configuration of is considered, as shown in (Figure 3). Each layer is a unidirectional carbon/epoxy (T300/934) material with a thickness of 0.5 mm; the corresponding mechanical properties are given in Table 1. The cylindrical shell is assumed to have a inner radius of 0.2 m and a length of 0.8 m, and both ends are assumed to be closed with rigid caps. The internal pressure of 250 psi is applied inside the cylinder while the inside and outside temperatures are and , respectively. The caps rigidly hold both ends of the cylinder, therefore, except the axial translation at one end, the other translational displacements are considered fixed at both boundaries, while the rotational degrees-of-freedom are allowed. The cylinder with the applied conditions is depicted in Figure 3. In this problem, three types of force vectors are considered:
a) the radial force vector due to the internal pressure,
| (28) |
in which is the vector of internal pressure, namely,
| (29) |
b) The axial force vector due to the internal pressure whose total magnitude equals to
| (30) |
Because there are four nodes at each end, the above magnitude is divided by four and applied on each node. In this problem, one end is free to move axially, hence, the axial forces are only applied to the nodes at the fixed end (as it is shown in Figure 3). Therefore, the axial force vector is defined as
| (31) |
It is noteworthy to mention that this axial force vector only exists for the element (the last one), and for the remaining elements it equals to zero.
c) The last force vector is related to the thermal load, namely,
| (32) |
The total force vector that is applied on the structure equals
| (33) |
where , , and are the assembled radial, axial, and thermal force vectors, respectively.
Table 1 Mechanical properties of the unidirectional carbon/epoxy (T300/934) [2]
Figure 4 (a) Uniform superelements, (b) Non-uniform superelements.
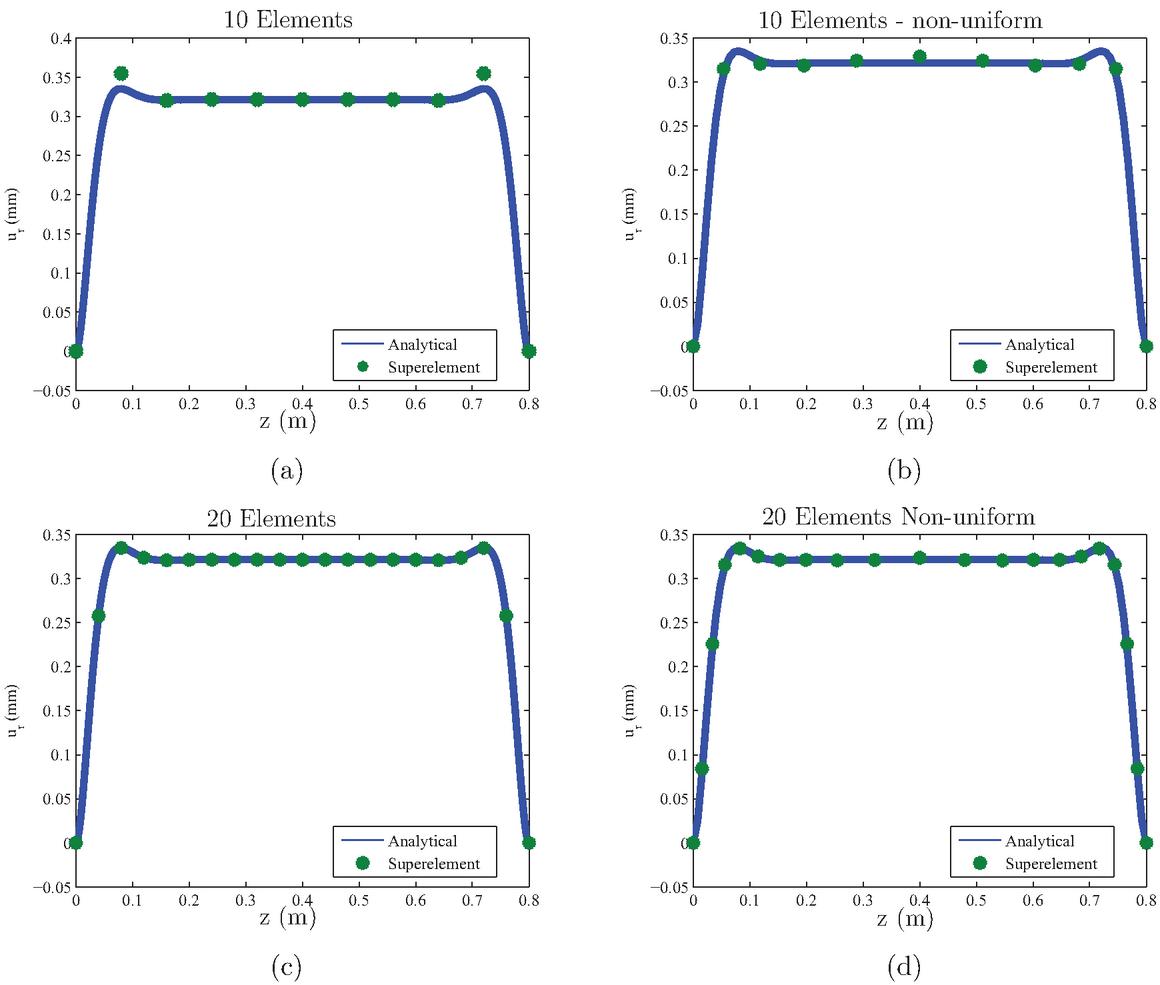
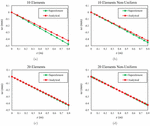
Figure 5 (a)–(d) The radial displacements obtained by 10 and 20 uniform and non-uniform elements.
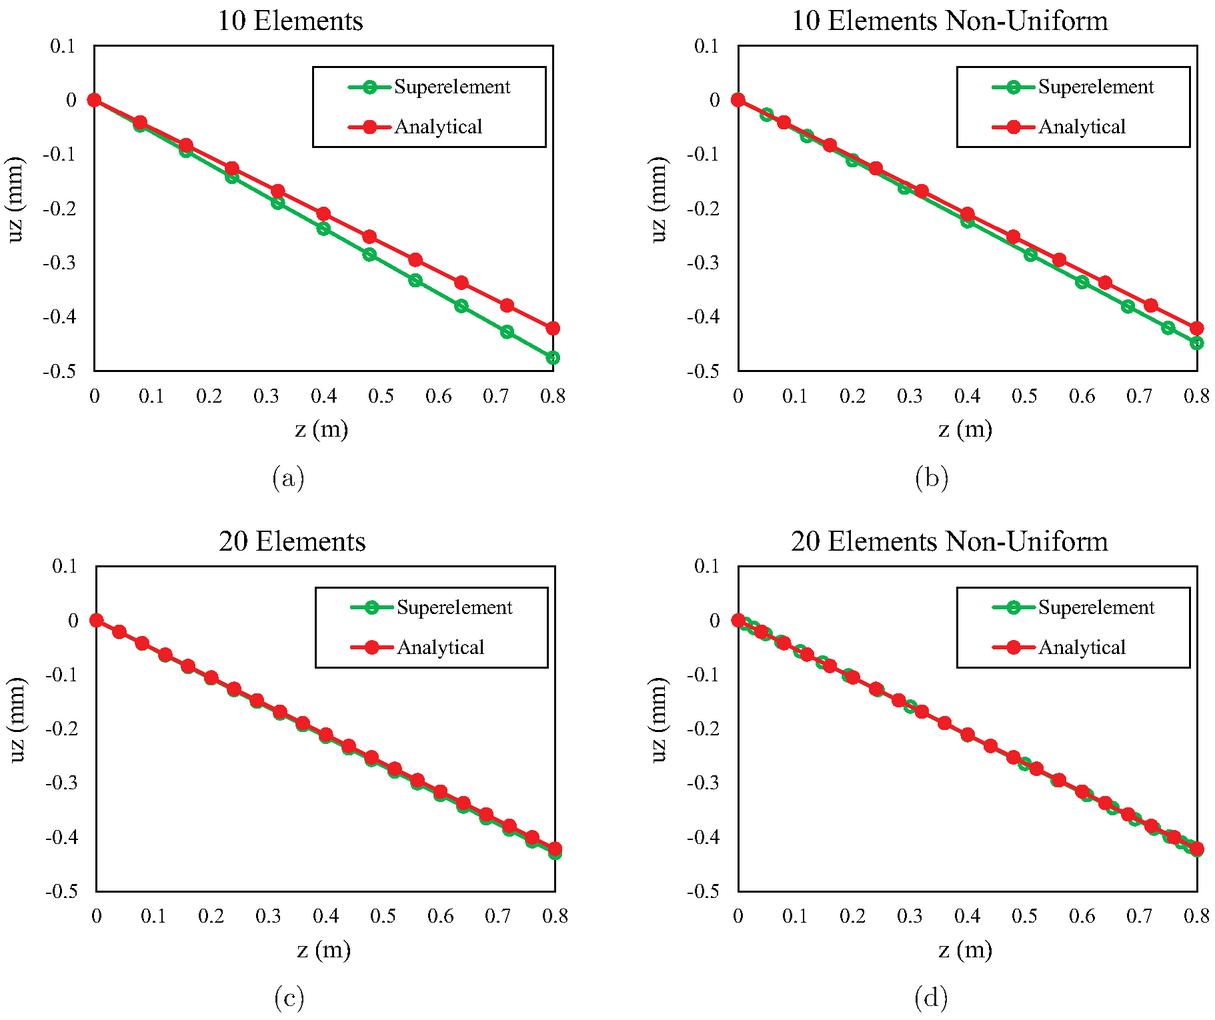
Figure 6 (a)–(d) The axial displacements obtained by 10 and 20 uniform and non-uniform elements.
4.1 Results
In the first attempt, the cylindrical shell is meshed longitudinally by 10 uniform superelements. Figure 5 shows the radial displacements obtained by the superelements and an analytical method which was presented in [27]. As it is apparent, at places where the bending is large, the superelement result deviated from the analytical solution. The bending boundary layer of a shell structure can be calculated via the following formula [27]
| (34) |
where in the current case . This means that the maximum bending deformation occurs approximately 134 mm from each end. With 10 superelements, each element has a length of 80 mm, and hence, two elements cannot accurately report the aggressive change of bending deformation. Thus, the number of elements should be elevated via a) decreasing the size of elements uniformly, b) using non-uniform superelements. In this case, 10 uniform and non-uniform superelements are incorporated. Figures 5(a) and 5(b) show the meshing with 10 uniform and non-uniform superelements, respectively. In Figures 5(a) and 5(b), the radial displacements which were calculated by 10 uniform and non-uniform elements are compared with the analytical results which were presented in [27]. The corresponding axial displacements are also depicted in Figures 6(a) and 6(b). In order to conduct a mesh independence analysis, the cylindrical shell is meshed with 20 and 30 uniform and non-uniform elements. The radial and axial displacements which are calculated by 20 uniform and non-uniform elements are presented in Figures 5(c), 5(d), 6(c), and 6(d), respectively. As it is apparent, the displacements converged rapidly as the number of elements is increased. Moreover, by comparing the results depicted in Figures 5 and 6, it is seen that proper accuracy can be obtained if the superelements are properly concentrated at places with abrupt changes. The maximum relative error (MRE) for the displacement results calculated with 10, 20, and 30 uniform and non-uniform elements are presented in Table 2. The last column of Table 2 also shows the computation run time corresponding to each number of elements. As it is expected, the maximum error occurs at places with sudden bending deformation changes. According to Table 2, non-uniform meshing leads to better results.
Table 2 Maximum Relative error (MRE) for displacement results obtained by different numbers of elements and the corresponding run time (CPU: 1.6 GHz Core i7, RAM: 8Gb.)
| Number of Elements | MRE | MRE | Run time (s) |
| N | |||
| N | |||
| N |
4.1.1 Stress Results
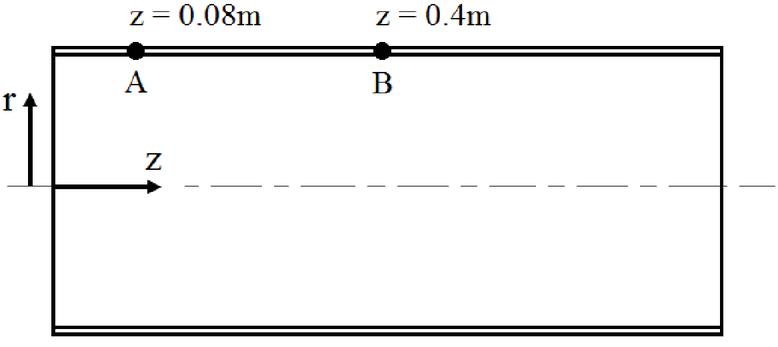
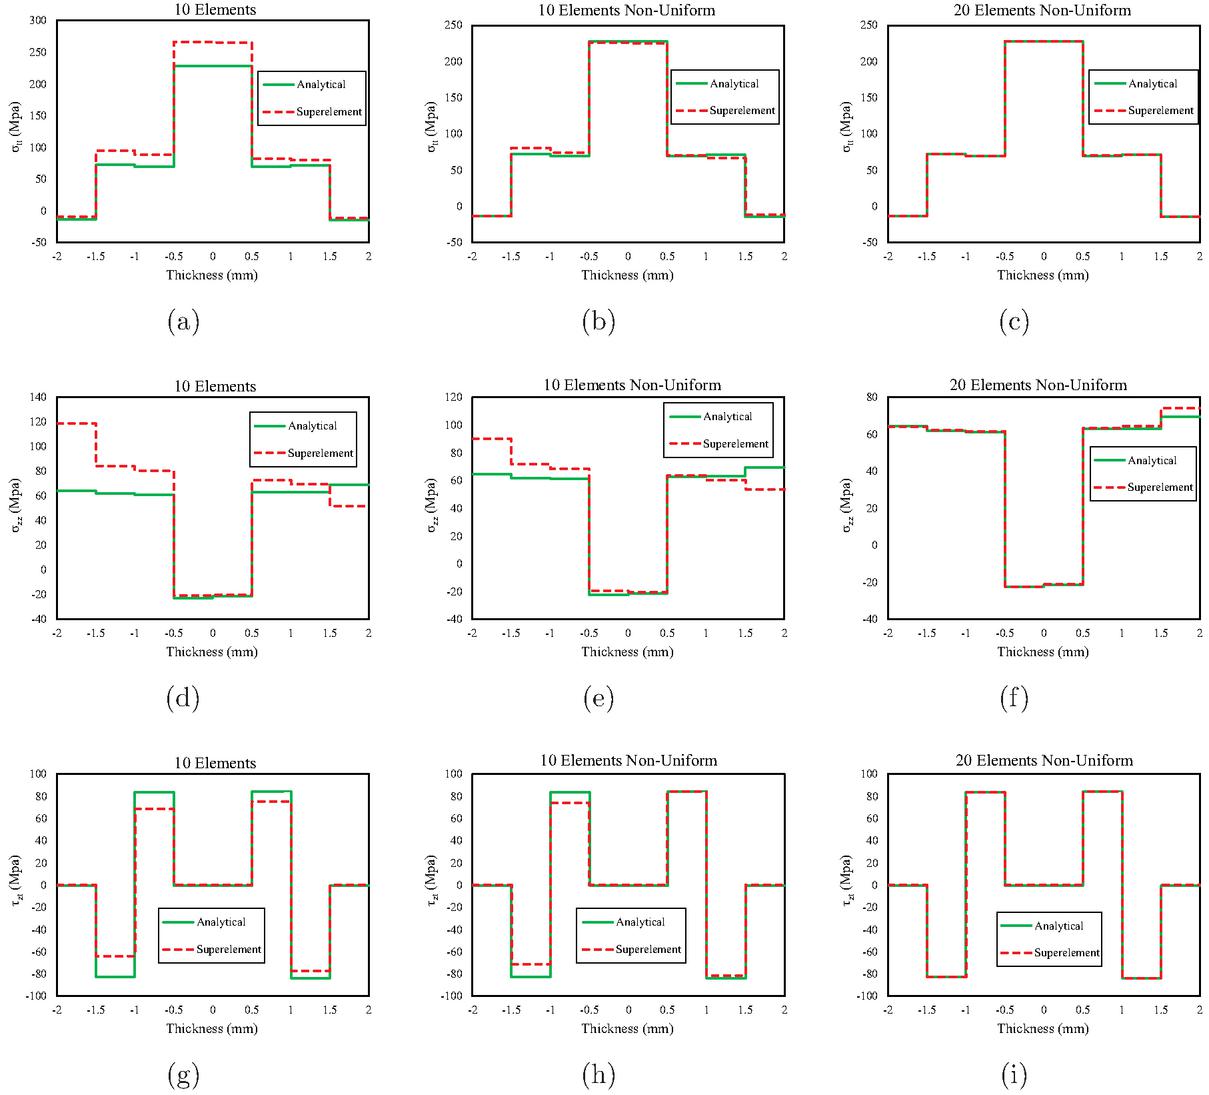
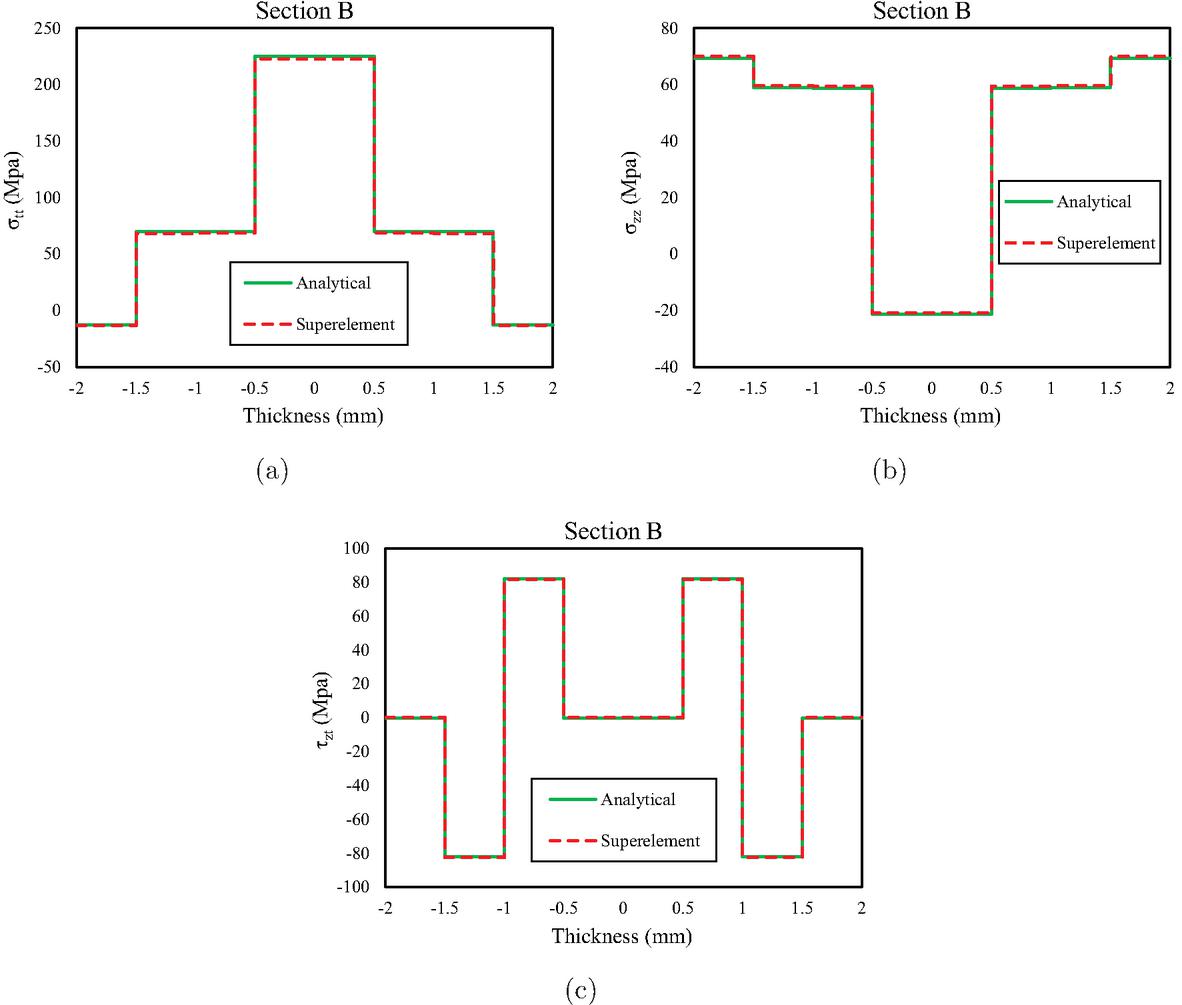
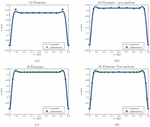
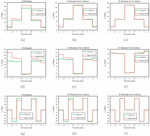
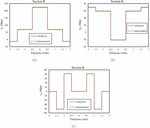
After calculation of the nodal displacements, the stress results can be derived at each element. Here, the stresses are calculated via the stress recovery method which is extensively explained in [31]. For the case study at hand, the stresses are calculated at each layer and at two different sections A and B, which are shown in Figure 7. The stresses are derived from the displacements. Hence, in order to keep accurate results, it is needed to use smaller elements, especially at places with drastic changes. Figure 8 shows the axial, tangential, and shear stresses at the plane A for 10 uniform and non-uniform and 20 non-uniform elements. The corresponding error for 10, 20, and 30 uniform and non-uniform elements are presented in Table 3. However, as it is depicted in Figure 9, at the plane B even with 10 elements the result is accurate enough. This is because the stress is constant over the central part of the composite cylinder.
Figure 7 Sections A and B.
Figure 8 (a), (b) and (c) The tangential stresses, (c), (d), and (e) the axial stresses, (e), (f), and (g) the shear stresses calculated with 10 uniform, 10 non-uniform and 20 non-uniform elements.
Figure 9 (a)–(c) The tangential, axial and shear stresses at section B calculated with 10 uniform elements.
The maximum relative error (MRE) of the stress results at the section A that are obtained by 10, 20, and 10 non-uniform elements are presented in Table 3. As the stress results are recovered from the nodal displacements, the errors are elevated, which is apparent from Table 1. However, in stress analysis the non-uniform meshing still leads to better results.
Table 3 Maximum Relative error (MRE) for stress results obtained by different number of elements.
| Number of Elements | MRE | MRE | MRE |
| N | |||
| N | |||
| N |
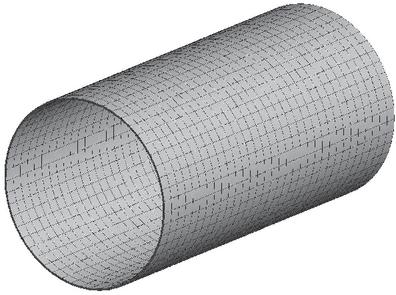
Figure 10 The cylinder which is meshed by shell elements.
Figure 11 (a) The radial and (b) the axial displacement plots of the cylinder obtained by a commercial software package.
5 Comparison with the results of shell elements
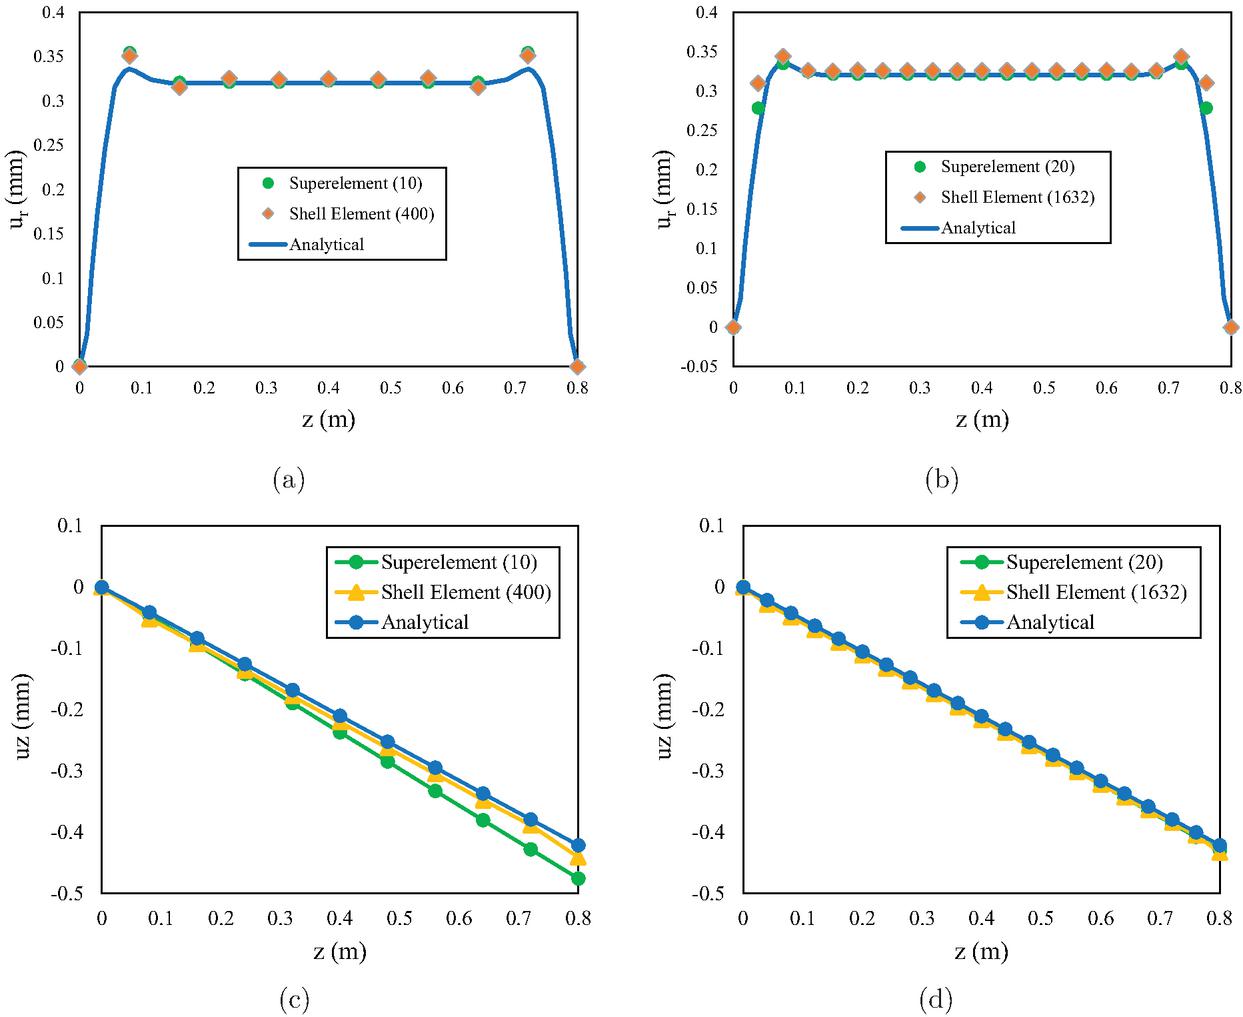
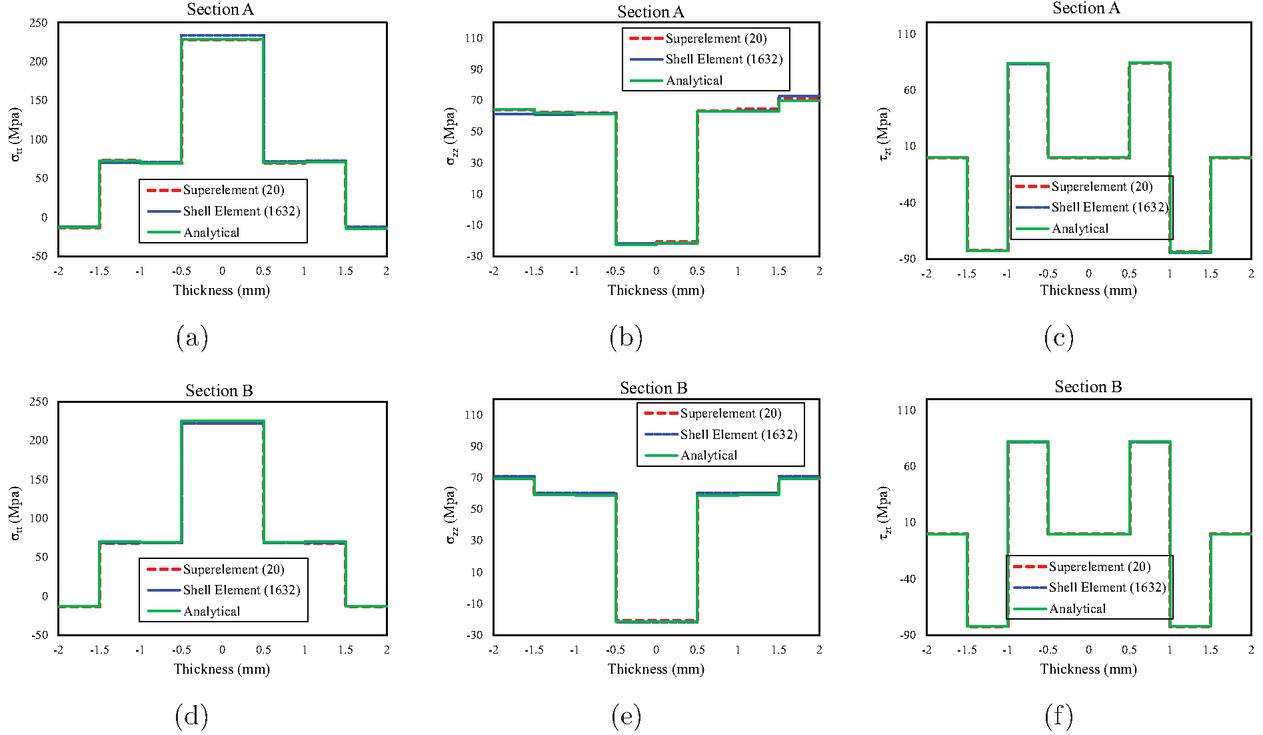
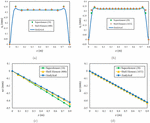
In this section, the results of the mentioned case study, which were obtained by means of uniform superelements, will be compared with the ones which are calculated by shell elements and via a commercial software package. Figure 10 shows the cylinder understudy which is meshed by shell elements. The boundary conditions, the applied internal pressure, temperature and the caps effect are defined same as to what was mentioned in the case study explanation. The obtained radial and axial displacement plots are depicted in Figures 11(a) and 11(b), respectively. In this regard, Figure 12 compares the radial and axial displacements which are obtained by superelements, shell elements and an analytical method. In Figure 12(a), the radial displacements which are estimated by 400 shell elements are compared with the ones resulted from only 10 superelements. Apparently, the results with 400 shell elements are compatible with the ones obtained by 10 superelements, however, both are deviated from the analytical solution close to the boundaries where the cylinder deform significantly. This deviation is resolved when the number of shell elements are decreased to 1632 and the superelements to 20, as it is depicted in Figure 12(b). Likewise, the corresponding axial displacements are also compared in Figures 12(c) and 12(d). In order to quantitatively verify the results of superelements, the maximum value of radial and axial displacements which are obtained by 1632 shell elements and 20 superelements are compared with the analytical ones in Table 4. After the comparison of displacement plots, now, the tangential, axial and shear stresses at sections A and B of cylinder (Figure 7) which are obtained by all three approaches are compared and depicted in Figures 13(a)–13(b). As it is apparent, because the section A is closer to one of the boundaries, the finite element results are deviated from the analytical ones; this can be resolved by adding more elements in that region as previously discussed. Table 5 shows the relative error of the stresses at section A in the layers where the maximum deviations happen between the ones obtained by the superelements and the analytical approach. As it can be seen, few cylindrical superelements can properly estimate the displacements and stresses in the model, comparing with the ones obtained by the analytical method and many shell elements.
Figure 12 (a) The radial and (b) the axial displacement plots of the cylinder obtained by a commercial software package.
Table 4 The maximum radial and axial displacements obtained by superelements and shell elements, and the corresponding relative errors with the analytical results.
| Analytical | Superelements | Error% | Shell Elements | Error% | |
| Radial Disp. | 0.336 | 0.335 | 0.3 | 0.344 | 2.3 |
| Axial Disp. | -0.421 | -0.429 | 1.9 | -0.433 | 2.8 |
Figure 13 The tangential, axial and shear stresses calculated with 20 uniform superelements, 1632 shell elements and the analytical method.
Table 5 The tangential, axial and shear stresses which are obtained at section A by 20 superelements and 1632 shell elements, and the corresponding relative errors with the analytical results.
| Stress (MPa) | Analytical | Superelements | Error% | Shell Elements | Error% |
| Tangential (Layer 1) | -12.69 | -12.86 | 1.34 | -12.38 | 2.44 |
| Axial (Layer 8) | 69.94 | 71.23 | 1.84 | 72.67 | 3.9 |
| Shear (Layer 2) | -82.93 | -82.45 | 0.24 | -82.65 | 0.33 |
6 Conclusions
In this paper, a cylindrical thin superelement is formulated based on the classical theory of shell and the trigonometric shape functions. The element targets the thermo-mechanical analysis of cylindrical thin structures made of composite materials; however, its application can be extended to other analyses such as coupled field or nonlinear analyses in which a large number of degrees of freedom, and accordingly, large number of equations exist. As a case study, a thermo-mechanical analysis of a thin cylindrical composite vessel, under an internal pressure and a temperature gradient, was conducted. In this example, a mesh independence analysis was performed by incorporating 10, 15, and 20 uniform elements. It is shown that as the number of superelements is increased the deformations are rapidly converged to the ones which were obtained in the literature analytically. Moreover, it is concluded that the same number of non-uniform elements can lead to more accurate results. After the calculation of displacements, the stress results are also derived, and accordingly, compared with the analytical ones. Finally, for the same case study, the displacement and stress plots which were obtained by superelements were compared with the ones calculated by shell elements. The comparison revealed that the incorporation of the superelements in the mechanical analysis of cylindrical structures is accurate and efficient.
Appendix
The Shape Functions
The shape functions of the cylindrical thin superelement corresponding to the -continuous approximation function of radial displacement are obtained as
in which
Also, the shape functions corresponding to the -continuous approximation functions of tangential and axial displacements are presented as
where,
References
[1] M. Xia, H. Takayanagi, K. Kemmochi, ‘Analysis of multi-layered filament-wound composite pipes under internal pressure’, Composite Structures 53 (2001) 483–491.
[2] M. Xia, H. Takayanagi, K. Kemmochi, ‘Analysis of lament-wound ber-reinforced sandwich pipe under combined internal pressure and thermo mechanical loading’, Composite Structures 51 (2001) 473–283.
[3] H. Bakaiyan, H. Hosseini, E. Ameri, ‘Analysis of multi-layered filament-wound composite pipes under combined internal pressure and thermomechanical loading with thermal variations’, Composite Structures 88 (2009) 532–541.
[4] P. Xu, J. Y. Zheng, ‘Finite element analysis of burst pressure of composite hydrogen storage vessels’, Composite Structures 30 (2009) 2295–2301.
[5] L. Parnas, N. Katirci, ‘Design of fiber-reinforced composite pressure vessels under various loading conditions’, Composite Structures 58 (2002) 83–95.
[6] L. A. L. Martins, F. L. Bastian, T. O. Netto, ‘Structural and functional failure pressure of filament wound composite tubes’, Materials and Design 36 (2012) 779–787.
[7] O. Sayman, ‘Analysis of multi-layered composite cylinders under hygrothermal loading’, Composites: Part A 36 (2005) 923–933.
[8] Q. Zhang, Z. Wang, C. Tang, D. Hu, P. Liu, L. Xia, ‘Analytical solution of the thermo-mechanical streeses in a multilayered composite pressure vessel considering the influence of the closed ends’, International journal of pressure vessels and piping 98 (2012) 102–110.
[9] K. Vedeld, H. Sollund, ‘Stresses in Heated pressurized multi-layer cylinders in generalized plane strain conditions’, International journal of pressure vessels and piping 120-121 (2014) 27–35.
[10] M. Jabbari, S. Sohrabpour, M. Eslami, ‘Mechanical and thermal stresses in a functionally graded hollow cylinder due to a radially symmetric loads’, International journal of pressure vessels and piping 79 (2002) 493–497.
[11] Z. Shao, ‘Mechanical and thermal stresses of a functionally graded circular hollow cylinder with finite length’, International journal of pressure vessels and piping 82 (2005) 155–163.
[12] T. S. Koko, ‘Super finite elements for nonlinear static and dynamic analysis of stiffened plate structures’, Ph.D. Thesis.
[13] T. Koko, M. D. Olson, ‘Vibration analysis of stiffened plates by super elements’, J. Sound Vib. 158 (1991) 149–167.
[14] J. Jiang, M. D. Olson, ‘Vibration Analysis of Orthogonally Stiffened Cylindrical Shells Using Super Finite Elements’, J. Sound Vib. 173 (1991) 73–83.
[15] J. Jiang, M. D. Olson, ‘Nonlinear analysis of orthogonally stiffened cylindrical shells by a super element approach’, Finite Elem. Anal. Des. 18 (1994) 99–110.
[16] M. T. Ahmadian, M. Zanganeh, ‘Nonlinear analysis of orthogonally stiffened cylindrical shells by a super element approach’, Comput. Methods Appl. Mech. Eng. 191 (2002) 2069–2075.
[17] M. T. Ahmadian, M. Zanganeh, ‘Application of super elements to free vibration analysis of laminated stiffened plates’, J. Sound Vib. 259 (2003) 1243–1252.
[18] F. Ju, Y. S. Choo, ‘Super element approach to cable passing through multiple pulleys’, Int. J. Solids Struct. 42 (2005) 3533–3547.
[19] M. T. Ahmadian, M. Bonakdar, ‘A new cylindrical element formulation and its application to structural analysis of laminated hollow cylinders’, Finite Element in Analysis and Design 44 (2008) 617–630.
[20] A. Taghvaeipour, M. Bonakdar, M. T. Ahamadian, ‘Application of a new cylindrical element formulation in finite element structural analysis of FGM hollow cylinders’, Finite Element in Analysis and Design 50 (2012) 1–7.
[21] M. Nasiri Sarvi, M. T. Ahmadian, ‘Design and implementation of a new spherical super element in structural analysis’, Finite Element in Analysis and Design 218 (14) (2012) 7546–7561.
[22] M. Nasiri Sarvi, M. T. Ahmadian, Deformation, stress and natural frequency analysis of the fullerene by finite super element method, International Design Engineering Technical Conferences and Computers and Information in Engineering Conference, August 28-31, Washington, DC, USA, 2011.
[23] M. T. Ahmadian, M. R. Movahhedy, M. M. Rezaei, ‘Design and application of a new tapered superelement for analysis of revolving geometries’, Finite Element in Analysis and Design 218 (47) (2011) 1242–1252.
[24] R. Pourhamid, M. T. Ahmadian, H. Mahdavy Moghaddam, A. R. Mohammadzadeh, ‘Mechanical analysis of a functionally graded cylinder-piston under internal pressure due to a combustion engine using a cylindrical super element and considering thermal loading’, Scientia Iranica 22 (2) (2015) 493–5–3.
[25] A. E. H. Love, A Treatise On The Mathematical Theory of Elasticity, Dover, New York, 1944.
[26] S. Timoshenko, S. Woinowski-Krieger, Theory of plate and shells, McGraw-Hill, New York, 1959.
[27] E. Venstel, T. Krauthammer, Thin plates and shells, Marcel Dekker, New York, 2001.
[28] M. R. Eslami, Finite Elements Methods in Mechanics, Springer International Publishing, Switzerland, 2014.
[29] S. S. Rao, The Finite Element Method in Engineering, Butterworth-Heinemann, United Kingdom, 2011.
[30] J. R. Vinson, R. L. Sierakowski, The Behavior of Structures Composed of Composite Materials, Kluwer Academic Publishers, New York, 2002.
[31] C. Felippa, Introduction to Finite Element Methods (ASEN 5007), http://www.colorado.edu/engineering/CAS/courses.d/IFEM.d.
Biographies

A. Jafarzadeh received his B.Sc. degree in mechanical engineering from University of Shahroud, Iran, in 2014 and the M.Sc. degree from the Amirkabir University of Technology (AUT), Iran in 2017. His research interests include finite element methods, numerical methods in engineering, creep and fatigue Life assessment in the hot section parts of gas turbines, composite structures design, designing machines and modulus for assembly and production process.

A. Taghvaiepour is an assistant professor at Amirkabir University of Technology (AUT), Iran. He received his B.Sc. from AUT in 2006, his M.Sc. from Sharif University of Technology (SUT) in 2008, and his Ph.D. form McGill University in 2012. His research interests are Structural and Dynamic analysis of Mechanical and Robotic Systems and Finite Element Analysis.

M. R. Eslami is an emeritus professor of mechanical engineering at Amirkabir University of Technology (AUT), Iran. He received his B.Sc. degree in mechanical engineering from Tehran Polytechnic, Iran, in 1968, the M.Sc. and Ph.D. degrees from the Louisiana State University, Baton Rouge La., USA, in 1970 and 1973, respectively. He is an ASME fellow. His main research fields are thermoelasticity and finite element methods (FEM).
European Journal of Computational Mechanics, Vol. 29_2-3, 173–198.
doi: 10.13052/ejcm2642-2085.29231
© 2020 River Publishers
