Finite Element and Experimental Analysis of Residual Stresses in Electron Beam Welded Nickel-Based Superalloys
Tom Saju and M. Velu*
School of Mechanical Engineering, Vellore Institute of Technology, Vellore,
Tamil Nadu, India
E-mail: tom.saju2019@vitstudent.ac.in; mvelu@vit.ac.in
Corresponding Author
Received 08 May 2021; Accepted 13 September 2021; Publication 06 October 2021
Abstract
In this paper, two different nickel-based superalloys, namely Inconel 718 and Nimonic 80A were joined using electron beam welding techniques with three different welding parameters. A finite element analysis (FEA) using Abaqus software was carried out to calculate the residual stresses due to welding. Both transverse and longitudinal residual stresses were determined. Also, an X-ray residual stress measurement system, -X360 Ver. 2.5.6.2 was used for measuring transverse residual stress along and across the weld centerline. The transverse residual stress found by FEA and that measured experimentally was nearly the same thus validating the FEA. Also, the peak values of longitudinal residual stress found using the FEA were close to the yield strengths of the base metals as found elsewhere.
Keywords: Nickel-based superalloys, electron beam welding, finite element analysis, Abaqus software, residual stress.
1 Introduction
Engineers around the world are concerned about the formation of residual stress, distortion, and cracking during the welding process. The presence of stresses without any external load in structures and materials is known as residual stresses. These stresses can be due to manufacturing processes, non-uniform plastic deformation, surface modifications like grinding, machining peening, etc., and density and material phase changes. Residual stress in welding is due to large thermal gradients. The welding process can result in both tensile and compressive residual stresses due to solidification shrinkage. Fusion zone and heat-affected zone (HAZ) pass through a larger temperature range than surrounding parent metal during welding. This results in shrinkage. To maintain dimensional stability, both fusion zone and HAZ develop tensile residual and compressive residual stresses respectively. Residual stresses developed can be harmful when these stresses cause cracks to form and results in premature fracture [1].
Inconel 718 and Nimonic 80A belong to the class of Nickel-based superalloys, which are mostly used in turbine engines. Inconel 718 offers high-temperature mechanical properties, oxidation and corrosion resistance, good weldability, and good tensile strength. This alloy is widely used in aerospace and industrial turbine applications [2]. Nimonic 80A finds application in gas turbine blades and disks. Both these alloys are used in blades and disks of turbines assembled in the fir-tree arrangement. Due to the limitations of fir-tree arrangement, the current trend is to use welding technology for joints. The electron beam welding (EBW) technique uses low heat input with high energy density and offers improved joint performance compared to other fusion welding technologies [3]. Hitherto, a few researchers have worked on residual stress measurements. Residual stress predictions were made by Venkata et al. using Abaqus software. From his studies, residual stresses were observed at the fusion zone due to localized heating during welding [4]. M. Wang et al. in thier paper on residual welding stress in Q345 plate found the presence of large residual stress along longitudinal welding direction. These stresses were observed to be exceeding the yield strength of the material [5]. Residual stress measurements in electron beam welded steel plate were found to be equal to the yield strength of the material. Post-weld heat treatment helps to reduce the residual stresses formed during welding [6]. H. Zhang et al. in their paper on electron beam welding on Nimonic 80A alloy found that the residual stress formed was smaller compared to conventional fusion welding processes. The smaller size of the fusion zone and narrow HAZ can be the reason for reduced residual stresses [7]. Aging heat treatment causes the strains in the base metal and weld zone to distribute uniformly. Due to holding at high temperature, residual stress formed was released and no strain concentration was found in the weld zone [8]. Bonakdar et al. studied the influence of EBW parameters on residual stress, temperature distribution, and distortion. From his studies, a higher amount of residual stresses was noticed in the fusion zone and HAZ. Tensile residual stresses formed in the fusion zone and HAZ are the main cause of cracking. The amount of power in the welding process has a proportional relation with the size of HAZ. If HAZ size is narrower, tensile residual stress will be reduced. As the welding speed is increased, heat input is decreased which causes HAZ to become smaller in width. Subsequently, tensile residual stress will be less [9].
In this paper, residual stress formed in electron beam welding of Inconel 718 and Nimonic 80A is analyzed in detail. Three different welding parameters were considered for the analysis. Transverse residual stress was plotted along (longitudinal) and across (transverse) the weld. While longitudinal residual stress was plotted for transverse direction. Residual stress results by FEA were validated by experimental results.
2 Experimental Procedures
Two dissimilar Nickel-based superalloys namely Inconel 718 and Nimonic 80A were used for this study. The as-received plates were made into similar dimensions for butt welding across the length using wire cut EDM. The plates were of 5 mm thickness each with a length of 20 mm and width of 30 mm. Electron beam welding was carried out in a vacuum atmosphere 7.49 10 at a frequency deflection of 200 Hz. The welded specimen in the as-welded condition is shown in Figure 1 (a) and the schematic of the welded joint is shown in Figure 1(b). Table 1 lists the chemical compositions of the base metals.
Figure 1 (a) Electron beam welded specimen, (b) Schematic of the welded joint.
An X-ray residual stress measurement system, -X360 Ver. 2.5.6.2 was used for experimental measurement. -X360 is a non-contact and non-destructive portable technique using an X-ray diffraction technique that measures residual stress. For Nickel alloys, an incident angle of 30 was maintained throughout the experiment. Transverse residual stress along the weld centerline for three different trails was measured using this instrument. Table 2 lists the welding parameters for three different trails A, B, and C.
Table 1 Chemical composition of Inconel 718 and Nimonic 80A
| Ni | Cr | Fe | Mo | Nb | Co | Mn | Al | Ti | Si | C | |
| Inconel 718 | 50–55 | 17–21 | 11.2–22.5 | 2.8–3.3 | 4.7–5.5 | 1.0 | 0.3 | 0.6–1.1 | 0.3 | 0.3 | 0.08 |
| Nimonic 80A | Balance | 18–21 | 3.0 max | – | – | 2.0 | 1.0 | 1–1.8 | 1.8–2.7 | 1.0 | 0.10 |
Table 2 Welding parameters
| Accelerating Voltage (kV) | Current (mA) | Weld Speed (mm/min) | |
| Trial A | 60 | 55 | 1750 |
| Trial B | 60 | 40 | 1750 |
| Trial C | 60 | 30 | 1500 |
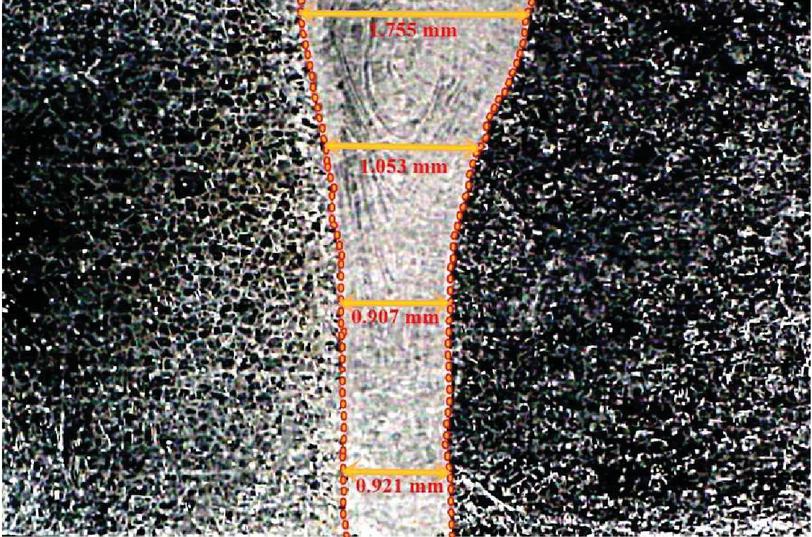
Macrostructure-specimen was prepared after grinding using different grades of emery paper and diamond polishing. After mirror-finishing, the specimen was applied with a proper etchant to reveal the weld zone. Two different etchants were applied since two dissimilar metals were welded. Equal parts of HCL, HNO, and acetic acid were used for Nimonic 80A, and HCL, HNO, and HF at a ratio of 2:2:1 were applied for Inconel 718. The macrostructure of the welded sample is used to calculate the input parameters for the Abaqus simulation. The macrostructure of the welded sample is given in Figure 2. The electron beam welding simulation model was created using Abaqus software. Softwares like Microsoft Visual Studio version 15, and Intel Fortran compiler 2017 were configured with Abaqus CAE 2020 to run the subroutine file needed for this simulation work. Subroutine file code is created in FORTRAN language with inputs from welding lab and Double ellipsoid heat source model developed for this study.
Figure 2 Macrostructure of electron beam welded specimen.
3 Modeling and Simulation
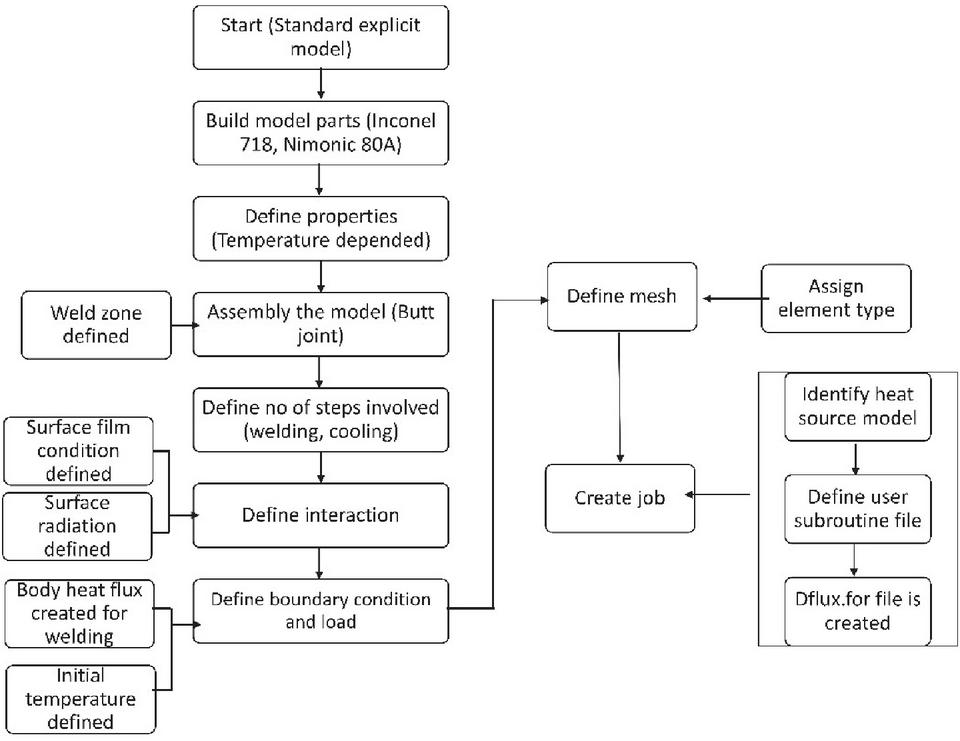
Residual stress prediction is important for mechanical and manufacturing industries. Finite element simulation software, Abaqus is used to model welding and determine residual stresses. Step by step procedure adopted for this study is given as a flowchart in Figure 3.
Figure 3 Schematic diagram of FEA model.
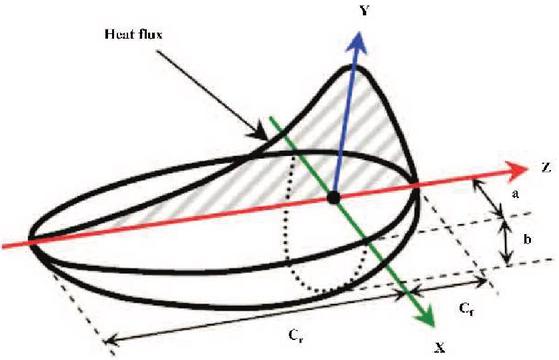
Goldak’s double-ellipsoid heat source model was adopted for EBW simulation of Inconel 718 to Nimonic 80A. Both the plates are of dimension 20 mm length, 30 mm width, and 6 mm thickness. Volumetric heat flux throughout the welding process was calculated using this simulation model. Figure 5 shows the heat source distribution. Analysis using Abaqus adopts a thermal-elastic plastic computational procedure to simulate both residual stress and temperature distribution along the weld. The physical and thermal properties of Inconel 718 and Nimonic 80A are given in Table 3. For simulation studies, temperature-dependent properties were used [10, 11].
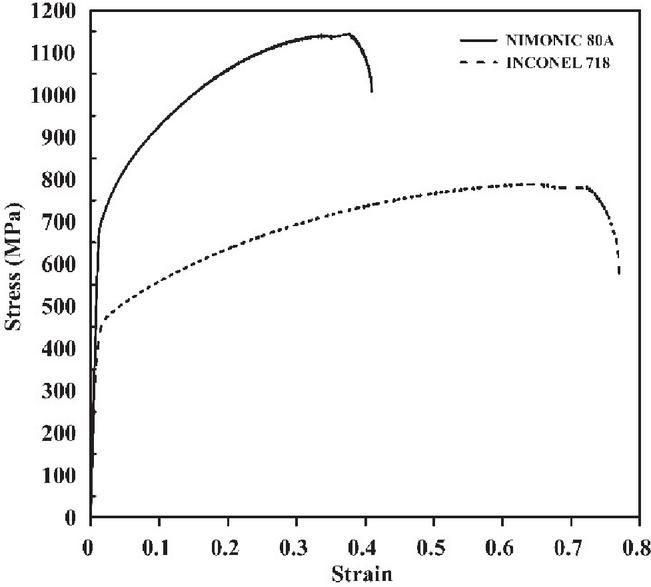
Hardening curve and mechanical properties for both the base metals, Inconel 718 and Nimonic 80A are given in Figure 4 and Table 4 respectively. Nimonic 80A base metal showed higher values of yield strength and ultimate tensile strength when compared to Inconel 718. While Inconel 718 showed more % elongation when compared to Nimonic 80A.
Table 3 Physical, and thermal properties of both Inconel 718 and Nimonic 80A
| Thermal | Thermal | Latent | Specific | |||
| Density | Poisson’s | Conductivity | Expansion | Heat | Heat | |
| (g/cm) | Ratio | (Wmk) | Coeff. (K) | (kJ/kg) | (JKkg) | |
| Inconel 718 | 8.21 | 0.3 | 10.8 | 1.28 10 | 227 | 435 |
| Nimonic 80A | 8.190 | 0.3 | 11.2 | 1.27 10 | 300 | 448 |
Figure 4 Stress-strain curve for the base metals.
The heat source model is divided into two quadrants. The heat source in the front quadrant, q (W/m)
| (1) |
The heat source in the rear quadrant, q (W/m)
| (2) |
Table 4 Mechanical properties of base metals
| Yield | Ultimate Tensile | Young’s | Average % | |
| Material | Strength (MPa) | Strength (MPa) | Modulus (GPa) | Elongation at Break |
| Inconel 718 | 471 | 788 | 200 | 53 |
| Nimonic 80A | 708 | 1144 | 180 | 31 |
Figure 5 Double ellipsoid heat source model [10, 11].
Input energy rate, , is the efficiency, I is the welding current and V is the welding voltage. Electron beam welding efficiency was assumed 80%. a,b, c and c define the shape and size of the heat source model. a, b, cf and cr defines the width of the heat source, depth of the heat source, front ellipsoid length, and back ellipsoid length respectively. These parameters are essential in defining the fusion zone and HAZ and were obtained from the the welding laboratory where electron beam welding was carried out. These heat source parameters are defined by the welding equipment used. Here in this study, a 4KW Evobeam electron beam welding machine was used. Variation in the welding parameters like voltage and current has a direct influence in this heat source parameters. Fractional factors, f, and f are determined using the following equations [11–13]:
| (3) | |
| (4) |
Table 5 , and for all three trials
| a (m) | b (m) | (m) | (m) | |
| Trial A | 0.0005795 | 0.0006 | 0.009 | 0.003 |
| Trial B | 0.00035 | 0.0006 | 0.006 | 0.002 |
| Trial C | 0.0002 | 0.0006 | 0.0015 | 0.0045 |
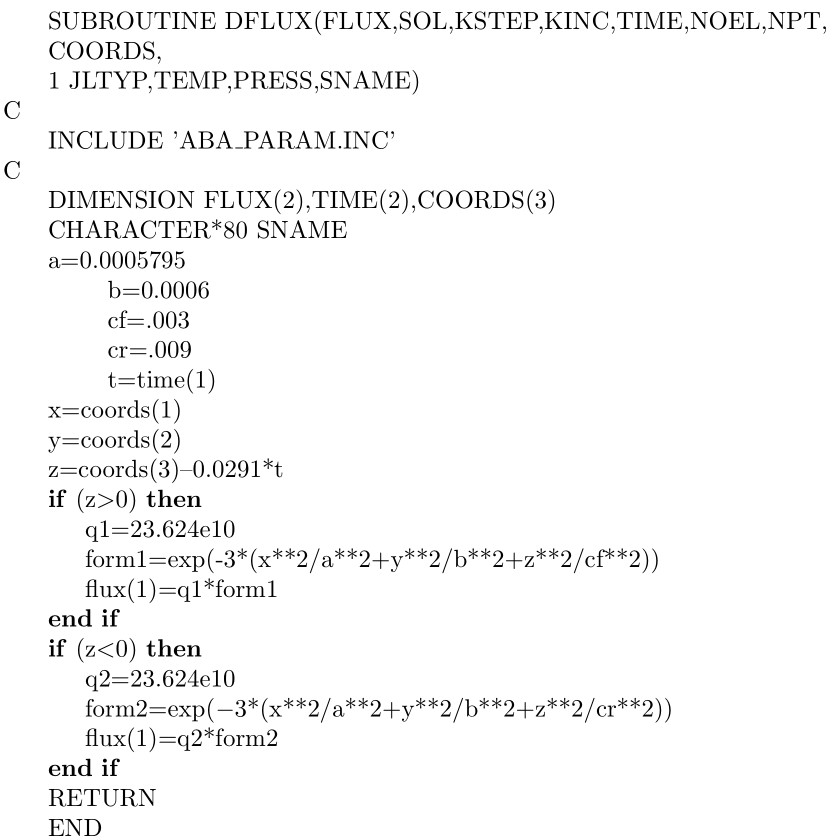
The parameters , , , and for all three different trials are given in Table 5. To implement the volumetric heat source into the Abaqus model, a user subroutine DFLUX file developed in FORTRAN language. The subroutine file attached for trial A is given in appendix.
Transient heat flux can be calculated on different welding positions by incorporating this subroutine program into the Abaqus model. Some assumptions considered for this simulation include:
• Weld pool shape was assumed to be Goldac double ellipsoid type.
• Thermal distribution was not affected due to displacement of parts during welding.
• Material properties were described until the liquid phase of base metal.
• Both radiation and convection properties are considered for this model.
Figure 6 Finite element model of weld specimen in Abaqus: (a) Model geometry, (b) Meshed model.
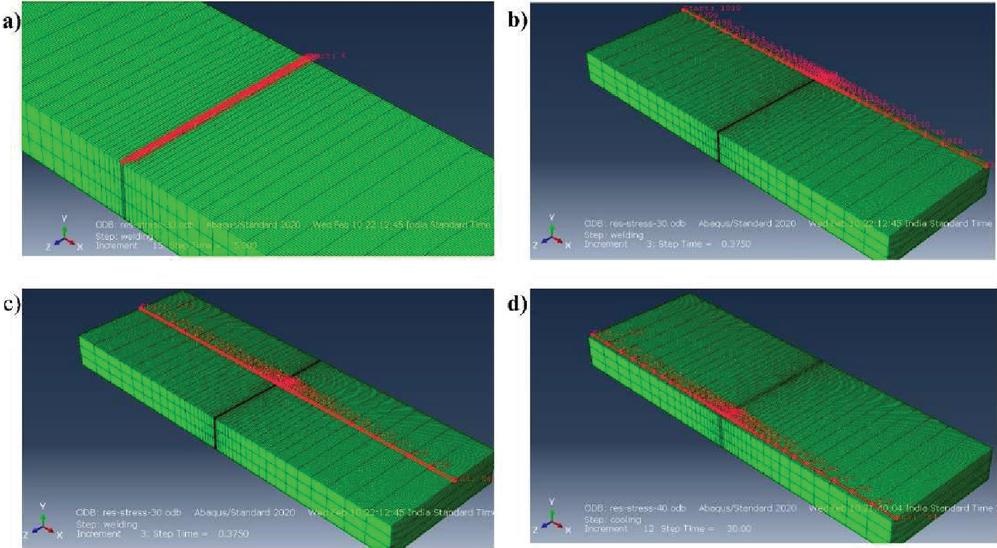
Figure 6 shows the finite element model used for EB welding in Abaqus simulation. Model geometry is given in Figure 6(a) and meshed model with fine mesh towards the weld area is given in Figure 6(b). Welding was carried out in z-direction at a speed of 29.3 mm/sec. The ambient temperature set for this analysis is 25C. 3-D mesh model consists of 7200 elements and 10184 nodes. An 8 node 3D thermal element DC3D8 was adopted with a single degree of freedom during meshing. Meshed model is given in Figure 6(b). Transverse and longitudinal Residual stress along the centerline of weld and in perpendicular directions were noted for simulation studies. The path for transverse residual stress along the weld centerline is given in Figure 7(a). Longitudinal residual stress for each trail was plotted in three different paths and the path is given in Figures 7(b), 7(c), and 7(d).
Figure 7 Residual stress path for simulation model: (a) Along the weld centerline, (b) Path 1 in the transverse direction of weld, (c) Path 2 in the transverse direction of weld, (d) Path 3 in the transverse direction of the weld.
4 Results and Discussion
Shrinkage forces are developed in the weld zone due to heating and cooling during welding. This shrinkage forces creates distortion. During welding, the base metal remains at room temperature throughout the welding process, while the welded zone is subjected to expansion and contraction. This cold part of the base metal restrains the welded zone from free contraction and expansion. These can cause stresses to build inside the welded area that cause distortion and produce residual stresses. One of the major problems of welding is distortion. Welding distortion can be classified as Transverse shrinkage, longitudinal shrinkage, angular distortion, buckling, and bowing [14]. Here in this paper, an Abaqus model is proposed to calculate the residual stress formed during electron beam welding. Simulation and experimental results were compared in the following discussion part to validate the proposed Abaqus model.
Figure 8 shows the temperature distribution during electron beam welding obtained by FEA. The temperature distribution from the Abaqus simulation result was shown along with the macrostructure of the welded sample. The fusion zone (FZ) and heat-affected zone (HAZ) experience the maximum temperature. The cooling rate for the EBW process is higher than normal arc welding processes. H Zang in his paper on electron beam welding of Nimonic 80A superalloy identified a cooling rate of 969C/s. Microsegragtion in the fusion zone during solidification is due to this high cooling rate. Fusion zone experiences high stress concentration due to grain size distribution [15]. Sharma et al. observed narrow HAZ and smaller grain size in the fusion zone in his studies on EBW of Inconel 718. This was due to the dissolution of segregated particles and low melting phases back into the matrix because of the heat effect during welding [2].
Figure 8 Fusion zone macrostructure and predicted temperature distribution.
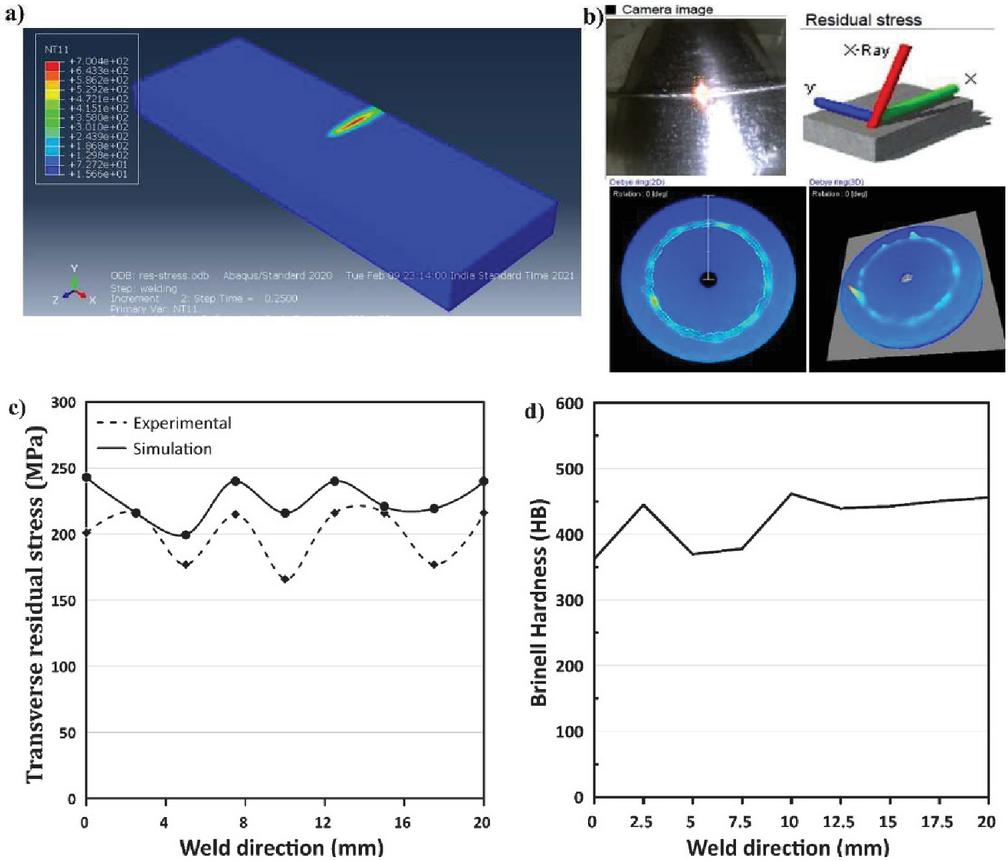
Figure 9 (a) Heat source during EBW, (b) Debye ring formed during experimental residual stress measurement, (c) Comparison of transverse residual stress by FEA and by experiment for trial-A, (d) Fusion zone hardness values along the weld centerline trial-A.
Transverse residual stress from the Abaqus model along the longitudinal direction of the weld was plotted and compared with experimental results in Figure 9 for trial-A. Electron beam welding simulation using Abaqus is shown in Figure 9(a). The movement of the heat source during welding is visible from Figure 9(a). -X360 uses two-dimensional detectors (imaging plates) to measure stress value using the cos method. Figure 9(b) explains the residual stress measurement mechanism and the Debye ring formed in experimental measurement [16]. A graph was plotted to compare both simulation and experimental results in Figure 9(c). Tensile residual stress is noticed in both experimental and simulation results along the weld centerline throughout the weld for 20 mm. Wang et al. in their studies on residual welding stress noticed an abnormal amount of tensile residual stress formed in the weld area [5]. From studies, residual stress is induced due to plastic deformation, heat fluctuation, precipitation, and phase transformation. During welding, most of the aforementioned mechanisms took place. Large induced residual stress can adversely affect life. Absence of shielding gas during EBW that caused heat retention was another reason to induce residual stress [17]. The maximum transverse residual stress observed from the simulation result was 243 MPa for trail A in the fusion zone. The experimental result observed maximum residual stress of 216 MPa. Transverse residual stress from both experimental simulation results showed a slight variation. -Instrument X360 can be also used to determine the hardness. Full-width half-maximum (FWHM) values obtained from experimental results were used to give the approximate hardness of the fusion zone. The hardness value observed at the weld centerline is given in Figure 9(d). From the plotted graph, an approximate hardness value of 400 HB was observed at the fusion zone of EBW weld.
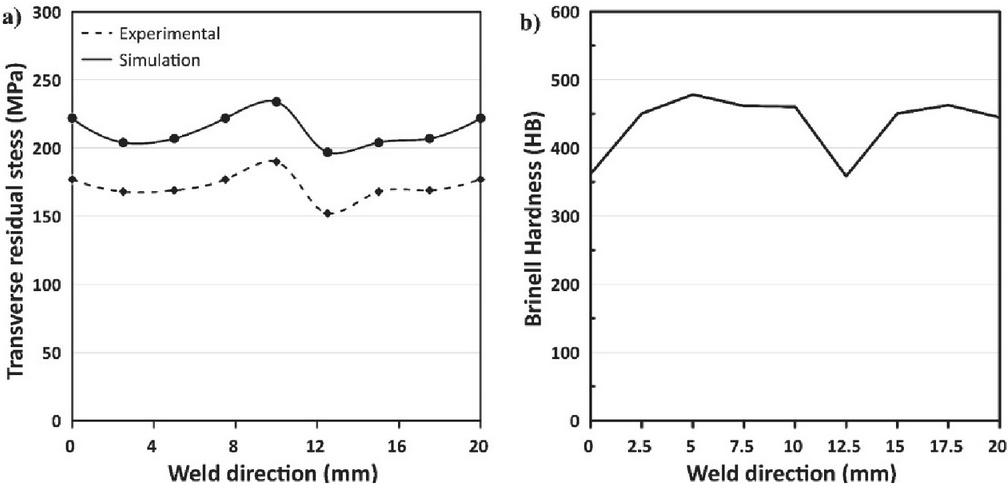
Figure 10(a) compares the transverse residual stress by FEA and by experiment for trial-B. Maximum transverse residual stress of 234 MPa is noticed from simulation studies. From the experimental result, maximum transverse residual stress of 225 MPa was observed. Approximate hardness values of weld zone for trial-B are shown in Figure 10(b). An average hardness value of 436.5 HB was noted in the fusion zone from the FWHM correlation using -X360.
Figure 10 (a) Comparison of transverse residual stress by FEA and by experiment for trial-B, (b) Fusion zone hardness value along the weld centerline for trial-B.
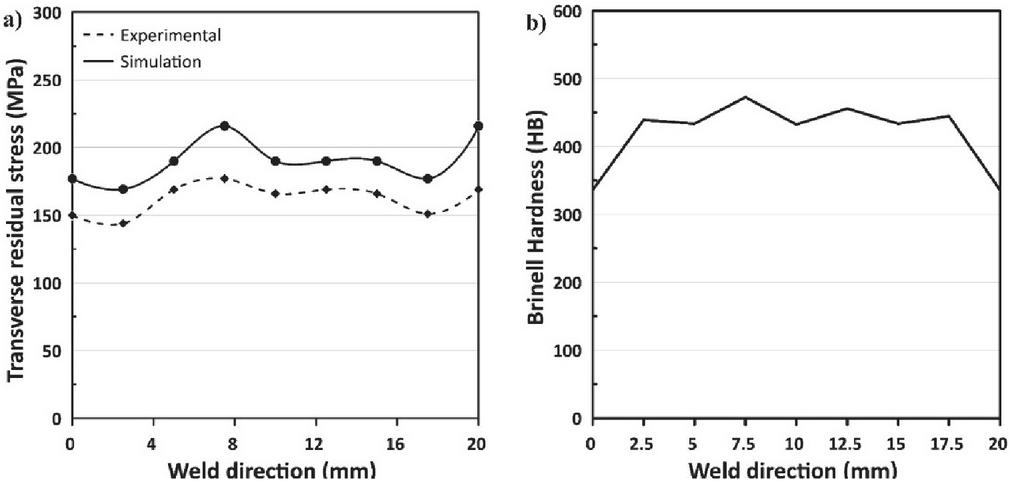
Simulation and experimental transverse residual stress values were noted for trial-C along the weld centerline. A plot comparing both simulation and experimental results is shown in Figure 11(a). For trail C, maximum transverse residual stress of 216 MPa was noted from the simulation result. From experimental studies, the maximum stress observed was 169 MPa. From the plot, both simulation and experimental results have a slight variation in peak results. Unlike other fusion welding processes, fusion zone and HAZ thickness are comparatively less for EBW, and hence the residual stress formed was small for the EBW process [18]. From the FWHM correlation, an average hardness value noted along the fusion zone was 420.5 HB. Transverse residual stress of all three trials showed a small difference between FEA and experimental results. In the case of FEA in Abaqus, the residual stress inherent in the base metal is considered as zero. While in actual base metals, a small amount of compressive residual stress was noticed before welding. This could be the reason for the difference. However, FEA results are thus validated by experimental results.
Figure 11 (a) Comparison of transverse residual stress by FEA and by experiment for trial-C, (b) Fusion zone hardness value along the weld centerline for trial-C.
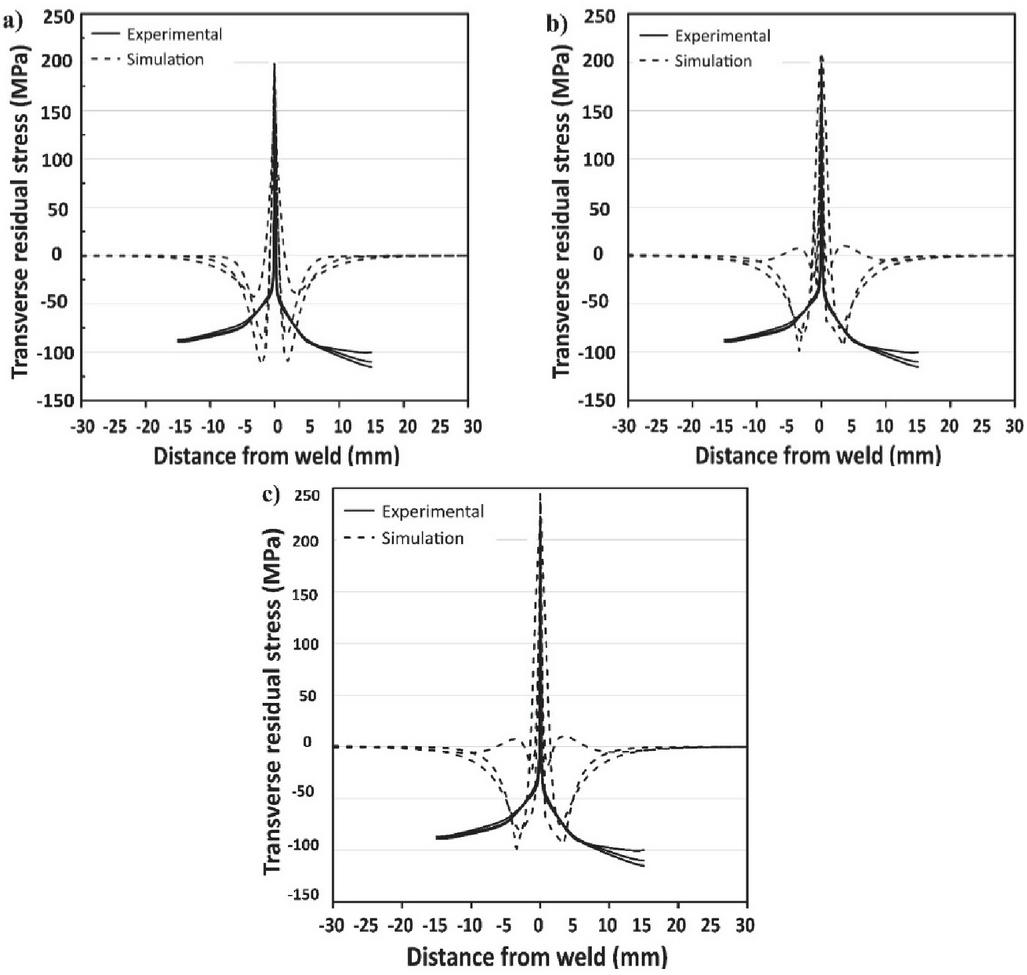
Transverse residual stress across the weld from the Abaqus simulation study is compared with experimental results in Figure 12 for all three trials. Three different paths, namely at the start of the weld, middle of the weld, and end of the weld transverse residual stress values are plotted. Compressive residual stress in the range of 100 MPa was observed for both the base metals. In the case of simulation, the base material residual stress was 0. No input condition was mentioned in the simulation studies to detect the residual stress inherent with the base metal. Towards the fusion zone, both experimental and simulation results observed a peak with similar values. This is due to the heat input during the EBW process. To validate the Abaqus simulation results, residual stress along three different paths was collected and plotted. Tensile residual stress observed in the fusion zone of EBW weld for both the simulation and experimental studies observed a similar trend. Kapadia et al. in their studies on quantification of residual stresses in EBW specimens also observed a similar kind of peak. The fusion zone experienced the maximum residual stress due to large plastic deformation induced because of the heat from electron beam kinetic energy. This cause strain concentration in the fusion zone that induced the tensile residual stress [19].
Figure 12 Comparison of transverse residual stress across the weld by FEA and by experiment for (a) trial-C, (b) trail-B, (c) trail-A.
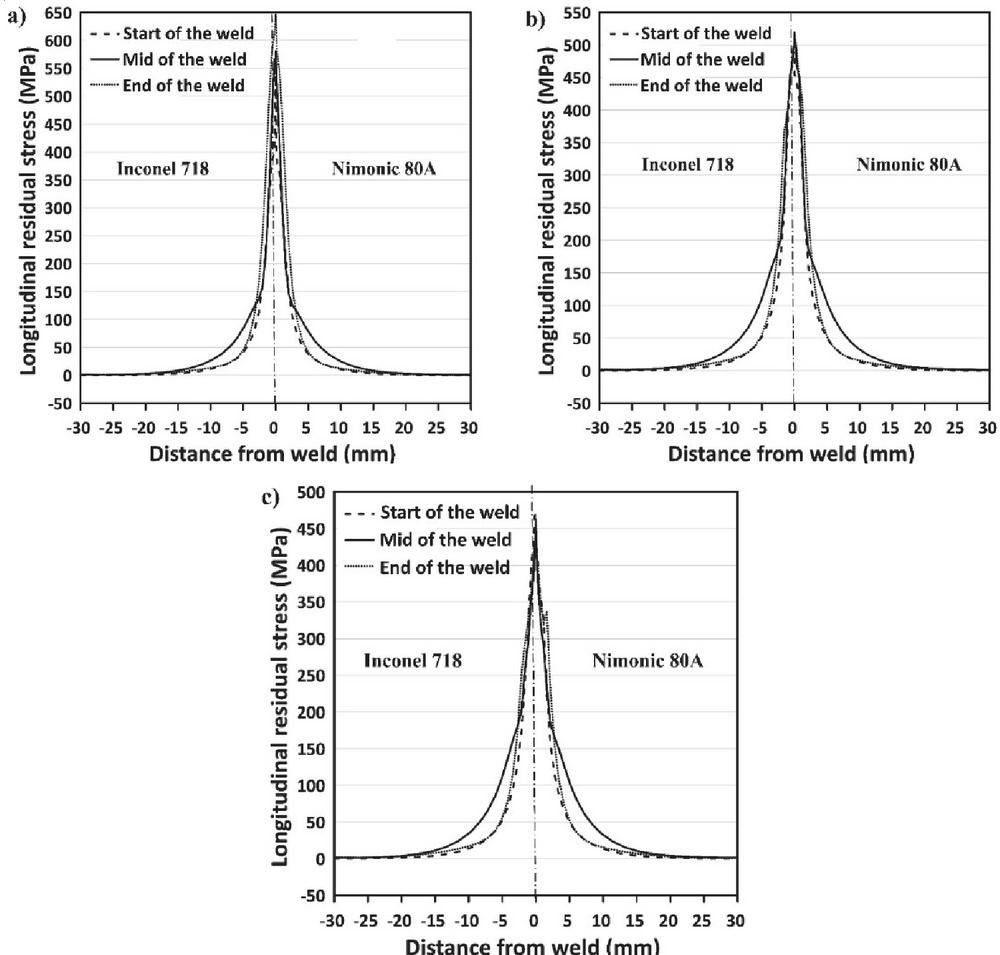
Longitudinal residual stress in the transverse direction of the weld from FEA simulation studies was plotted for three trials for three different paths. The paths chosen for plotting longitudinal residual stress are shown in Figures 7(b), 7(c), and 7(d). Results were plotted in Figure 13. The maximum value of longitudinal residual stress was nearer to the yield strength of the base material. Smith et al. noticed a similar result in thick EBW specimen [6]. Both the base metals were tensile-tested for yield strength in as-received condition. The yield strengths of Inconel 718 and Nimonic 80A were 471 MPa and 708 MPa respectively. The welding residual stress observed was a little lesser than the yield strength of the material [20]. The observed trend of maximum longitudinal residual stress values nearer to the yield strength of the material can be validated using similar results obtained by Smith et al. [6] and Wang et al. [20].
Figure 13 Longitudinal residual stress across the weld by finite element method for (a) trial-A, (b) trial-B, (c) trail-C.
5 Conclusions
Residual stress due to electron beam welding (EBW) is analyzed by finite element analysis (FEA) using Abaqus and by experiments. The proposed FEA model was validated using experimental results and literature. Three different welding parameters were considered to make three different weldments. The following conclusions can be drawn from the analysis and experiment results.
• Transverse residual stress along the weld remains nearly constant and is tensile with small fluctuations though. The stress values by FEA are nearer to those measured experimentally, thus validating the FEA.
• Transverse residual stress across the weld has its maximum tensile stress value in the weld and gradually reduces to zero towards base metals.
• Large tensile longitudinal residual stress values were observed in the weld and small compressive stresses were noted adjacent to the weld viz., heat affected zone (HAZ). The stress approached zero towards the base metal moving away from the weld. A similar trend is observed across the weld at the start, end, and in the mid of the weld.
• The maximum longitudinal residual stress values obtained from Abaqus simulation was in the order of yield strength of the base metal as also found in the literature
Appendix
The subroutine file attached for Electron beam welding simulation for trial A is given below.
References
[1] G.S. Schajer, C.O. Ruud, Overview of Residual Stresses and Their Measurement, Pract. Residual Stress Meas. Methods. (2013) 1–27. https://doi.org/10.1002/9781118402832.ch1.
[2] S.K. Sharma, P. Agarwal, J.D. Majumdar, Studies on Electron Beam Welded Inconel 718 Similar Joints, Procedia Manuf. 7 (2017) 654–659. https://doi.org/10.1016/j.promfg.2016.12.097.
[3] H. Zhang, J.K. Li, Z.W. Guan, Y.J. Liu, D.K. Qi, Q.Y. Wang, Electron beam welding of Nimonic 80A: Integrity and microstructure evaluation, Vacuum. 151 (2018) 266–274. https://doi.org/10.1016/j.vacuum.2018.01.021.
[4] K.A. Venkata, S. Kumar, H.C. Dey, D.J. Smith, P.J. Bouchard, C.E. Truman, Study on the effect of post weld heat treatment parameters on the relaxation of welding residual stresses in electron beam welded P91 steel plates, Procedia Eng. 86 (2014) 223–233. https://doi.org/10.1016/j.proeng.2014.11.032.
[5] M. Wang, W. Qu, Y. Wang, Experimental Study and Numerical Simulation on Residual Welding Stress Relaxation, IOP Conf. Ser. Earth Environ. Sci. 455 (2020). https://doi.org/10.1088/1755-1315/455/1/012042.
[6] D.J. Smith, G. Zheng, P.R. Hurrell, C.M. Gill, B.M.E. Pellereau, K. Ayres, D. Goudar, E. Kingston, Measured and predicted residual stresses in thick section electron beam welded steels, Int. J. Press. Vessel. Pip. 120–121 (2014) 66–79. https://doi.org/10.1016/j.ijpvp.2014.05.001.
[7] H. Zhang, C. Huang, Z. Guan, J. Li, Y. Liu, R. Chen, Q. Wang, Effects of the Electron Beam Welding Process on the Microstructure, Tensile, Fatigue and Fracture Properties of Nickel Alloy Nimonic 80A, J. Mater. Eng. Perform. 27 (2018) 89–98. https://doi.org/10.1007/s11665-017-3068-x.
[8] H. Zhang, P. Li, Q. Wang, Z. Guan, Y. Liu, X. Gong, Electron Beam Welding of Nimonic 80A Superalloy: Microstructure Evolution and EBSD Study After Aging Heat Treatment, J. Mater. Eng. Perform. 28 (2019) 741–752. https://doi.org/10.1007/s11665-018-3817-5.
[9] A. Bonakdar, M. Molavi-Zarandi, A. Chamanfar, M. Jahazi, A. Firoozrai, E. Morin, Finite element modeling of the electron beam welding of Inconel-713LC gas turbine blades, J. Manuf. Process. 26 (2017) 339–354. https://doi.org/10.1016/j.jmapro.2017.02.011.
[10] P. Lacki, K. Adamus, Numerical simulation of the electron beam welding process, Comput. Struct. 89 (2011) 977–985. https://doi.org/10.1016/j.compstruc.2011.01.016.
[11] A.C. & M.B. John Goldak, A New Finite Element Model for Welding Heat Sources, Metall. Trans. B. 52 (1984) 299–305. https://doi.org/10.1080/21681805.2017.1363816.
[12] S. Feli, M.E.A. Aaleagha, M.R. Jahanban, Evaluation Effects of Modeling Parameters on the Temperature Fields and Residual Stresses of Butt-Welded Stainless Steel Pipes, 1 (2017) 25–33.
[13] A.S.M. Zainal, A. Hanim, J.T. Jernang, B.B. Bangi, The Effect of Welding Process Parameter on Temperature and Residual Stress in Butt-Joint Weld of Robotic Gas Metal Arc Welding, Aust. J. Basic Appl. Sci. 7 (2013) 814–820.
[14] K. Weman, Welding residual stress and distortion, Weld. Process. Handb. i (2012) 185–189. https://doi.org/10.1533/9780857095183.185.
[15] H. Zhang, P. Li, Q. Wang, Z. Guan, Y. Liu, X. Gong, Electron Beam Welding of Nimonic 80A Superalloy: Microstructure Evolution and EBSD Study After Aging Heat Treatment, J. Mater. Eng. Perform. 28 (2019) 741–752. https://doi.org/10.1007/s11665-018-3817-5.
[16] Keisuke TANAKA, The cos method for X-ray residual stress measurement using two-dimensional detector.pdf, (2019) 1–16.
[17] M. Junaid, F.N. Khan, N. Baksh, M.N. Baig, K. Rahman, Study of microstructure, mechanical properties and residual stresses in full penetration electron beam welded Ti-5Al-2.5Sn alloy sheet, Mater. Des. 139 (2018) 198–211. https://doi.org/10.1016/j.matdes.2017.11.009.
[18] Y. Jun Li, A. Ping Wu, Q. Li, Y. Zhao, R. Can Zhu, G. Qing Wang, Effects of welding parameters on weld shape and residual stresses in electron beam welded Ti 2 AlNb alloy joints, Trans. Nonferrous Met. Soc. China (English Ed. 29 (2019) 67–76. https://doi.org/10.1016/S1003-6326(18)64916-7.
[19] P. Kapadia, C. Davies, T. Pirling, M. Hofmann, R. Wimpory, F. Hosseinzadeh, D. Dean, K. Nikbin, Erratum to “Quantification of residual stresses in electron beam welded fracture mechanics specimens” (International Journal of Solids and Structures (2017) 106(107) (106–118) (S0020768316303614) (10.1016/j.ijsolstr.2016.11.028)), Int. J. Solids Struct. 113–114 (2017) 255. https://doi.org/10.1016/j.ijsolstr.2017.03.017.
[20] F. Wang, Z. da Lyu, Z. Zhao, Q. kai Chen, H.L. Mei, Experimental and numerical study on welding residual stress of U-rib stiffened plates, J. Constr. Steel Res. 175 (2020) 106362. https://doi.org/10.1016/j.jcsr.2020.106362.
Biographies

Tom Saju is presently doing his Ph.D. in welding technology from the Vellore Institute of Technology. Vellore, Tamil Nadu, India. He has completed his M Tech in 2019 from Karunya Institute of Technology and Science, Coimbatore, Tamil Nadu, India, and B Tech degree in 2016 from Mahatma Gandhi University, Kerala, India. His area of interest includes similar and dissimilar welding technology, Finite element analysis, material characterization, fracture studies, etc.

M. Velu is an Associate Professor in the School of Mechanical Engineering, VIT University, Vellore, India. He received his Ph.D. in the field of Fracture and Fatigue of Dissimilar Welded Joints in 2015 from VIT University, Vellore, Tamil Nadu, India, M. E degree in Engineering Design from College of Engineering Guindy, Anna University, Chennai, Tamil Nadu, India in the year 1999 and B.E degree in Mechanical Engineering from University of Madras, India in the year 1995. His area of interest includes Similar Welding, Dissimilar Welding, Fracture, and Fatigue of metals. He has more than 20 years of teaching experience and 10 years of research experience. He has published research papers in the field of Fracture, Fatigue, and Welding. Currently, he is working in the field of Fracture, Fatigue of Dissimilar Welded Joints of Ni-based Super-alloys for Gas Turbine applications.
European Journal of Computational Mechanics, Vol. 30_2-3, 255–274.
doi: 10.13052/ejcm2642-2085.30235
© 2021 River Publishers

